Difference between revisions of "Hire and Attack"
| (17 intermediate revisions by 3 users not shown) | |||
| Line 1: | Line 1: | ||
| − | Our friend Logan owns the local pub. | + | Our friend Logan owns the local pub. Once we boot Billy's goons from his pub, he will let us use his Pub to hire Mercenaries using our product. There are 8 types of Mercenaries available at the moment in the game namely |
*Goon | *Goon | ||
| − | * | + | *Hoodlum |
*Firebird | *Firebird | ||
*Bazooka | *Bazooka | ||
| + | *Raider | ||
| + | *Detonator | ||
| + | *Ironclad | ||
| + | *Medic | ||
| + | |||
==Merc Camp== | ==Merc Camp== | ||
Merc camp is were Mercenaries will be accommodated and just like Mobs Mercs will also have their own individual assign space. There should be enough space available in the Camp to train the new Mercenaries. | Merc camp is were Mercenaries will be accommodated and just like Mobs Mercs will also have their own individual assign space. There should be enough space available in the Camp to train the new Mercenaries. | ||
==Attack== | ==Attack== | ||
| − | Trained Mercs along with the Bosses will be available to be taken into the attack. | + | [[File:AttackWindow.png|400px|left]] |
| − | Units can only be dropped one cell outside the buildings | + | <br/> |
| + | <br/><br/><br/><br/><br/><br/><br/><br/><br/> | ||
| + | Trained Mercs along with the Bosses will be available to be taken into the attack. The fight button at the Left bottom corner will take the player to the attack screen. On the left side, there will be three Buttons for Attack, Boss Fight, and Rivals. Fight window will have a list of fellow Gangstaz who is in your attack range. From there on clicking attack on any of the opponents will take the player to the opponents Hood. There you can analyze the Hood for 1 minute and then initiate the Fight by dropping the units. | ||
| + | Units can only be dropped one cell outside the buildings and not on the roads too. | ||
Players will win an attack only if they destroy the Mansion, this means even if they destroy at least 50% of the opponents Hood and fails to destroy the mansion it will be treated as a defeat. A star is Given for 50% Destruction and the second for Mansion Destruction and the third and final star is awarded for 100% destruction. But the 50% will be available only if you destroy the Mansion. | Players will win an attack only if they destroy the Mansion, this means even if they destroy at least 50% of the opponents Hood and fails to destroy the mansion it will be treated as a defeat. A star is Given for 50% Destruction and the second for Mansion Destruction and the third and final star is awarded for 100% destruction. But the 50% will be available only if you destroy the Mansion. | ||
| − | The Loot available will be mentioned on the right top side of the screen. | + | The Loot available will be mentioned on the right top side of the screen. |
| + | <br/> | ||
| + | Most mercs will attack the nearest available structure and will attack back the Mobs guarding them if they attack the Mercs. However, each merc has specialization that guides its behaviour in fights. The same applies to the bosses too. But bosses have an attack guide. Players can select a Boss and tap on the screen to guide them during an attack. | ||
| + | <br/> | ||
| + | === '''PvP attack''' === | ||
| + | Against nearby Gangstaz. There will be a Level check and you will not be able to attack the ones with a Shield. | ||
| + | === '''Boss Fight''' === | ||
| + | Against the Bosses. If you can defeat them 12 Times they will join you as a Boss. Each Boss fight win will earn you a Skill point too. | ||
| + | === '''Rival Attacks''' === | ||
| + | That Gangstaz who has attacked you and won are listed here. You can attack them even if they have a shield or are under your Level limits. | ||
| + | <br/> | ||
| + | <br/> | ||
| + | === '''[[Hitlist]]''' === | ||
| + | If an opponent is notorious and is too hard to beat, put a price on him. Add that player to the Hitlist and other players will hunt him for you in return of the Bounty. The details are listed on the Hitlist page. | ||
| + | |||
| + | === '''Shield''' === | ||
| + | If a player is attacked a defeated he will have a shield for an hour. This shield will guard you against further attacks but if you initiate an attack the shield will be taken off. | ||
| + | Also, the shield is not applicable in Rival hits. | ||
| + | |||
| + | ==Attack Squad== | ||
| + | From the Crew Icon on the right-hand side players can access the Crew Menu. There are two option in the Menu; '''Crew''' and '''Attack Squads'''. | ||
| + | *'''Crew''' | ||
| + | [[File:Crew.jpeg|400px|left]] | ||
| + | <br/> | ||
| + | <br/><br/><br/><br/><br/><br/><br/><br/><br/> | ||
| + | It lists the Bosses, Mercs, and Mobs Trained and Ready in the Pub. you can further heal the Bosses and Train/Upgrade Mercs and Mobs from this Menu. Even boosts can also be upgraded from here. | ||
| + | *'''Attack Squads''' | ||
| + | [[File:AttackSquad.jpeg|400px|left]] | ||
| + | <br/> | ||
| + | <br/><br/><br/><br/><br/><br/><br/><br/><br/> | ||
| + | Players can create 5 Different attack squads. Click on the Edit button next to each squad line to customize them. Choose the Various Mercs and Bosses you want in your squad and only limitation you have will be the Camp capacity. Also, keep in mind to hire them from the Pub. Now, once this is done, when you are about to attack an opponent, you will have the attack squads option at the bottom left corner - click and select the squad you choose to attack them with and win the Battle. | ||
==Merc Workshops== | ==Merc Workshops== | ||
| + | [[File:PubIn.png|400px|left]] | ||
| + | <br/> | ||
| + | <br/><br/><br/><br/><br/><br/><br/><br/><br/> | ||
Mercenaries can be trained at Merc Workshops, to improve their abilities and the feature will be available with future updates. | Mercenaries can be trained at Merc Workshops, to improve their abilities and the feature will be available with future updates. | ||
| + | |||
| + | ==Mercenaries== | ||
| + | There are Five Mercenaries and they shall be unlocked at higher levels of Logan's Pub. | ||
| + | ===Goon=== | ||
| + | Runs into fights with a killer swing and a deathwish. A beast when in a pack, expect more than just broken bones. | ||
| + | *Consumes - 1 Training/Camp Space | ||
| + | *Stats | ||
| + | **Attack Power - 4 | ||
| + | **Hit Points - 30 | ||
| + | **Speed - 280 | ||
| + | **Range - 1 | ||
| + | **Reload Time - 0.75 | ||
| + | **Cost - 2 Products | ||
| + | **Training Time - 5 Sec | ||
| + | ===Hoodlum=== | ||
| + | A sharpshooter who likes to keep his distance, but hus bullets never miss the mark specially when taking that sweet headshot. Deals 50% extra damage to Units. | ||
| + | *Consumes - 2 Training/Camp Space | ||
| + | *Stats | ||
| + | **Attack Power - 6 | ||
| + | **Hit Points - 30 | ||
| + | **Speed - 250 | ||
| + | **Range - 3.4 | ||
| + | **Reload Time - 0.8 | ||
| + | **Cost - 6 Products | ||
| + | **Training Time - 15 sec | ||
| + | ===Firebird=== | ||
| + | A pyromaniac in high heels. How she runs that fast!! A twisted firestarter who likes to watch her enemies burn down! Deals 50% extra damage to resource buildings. | ||
| + | *Consumes - 3 Training/Camp Space | ||
| + | *Stats | ||
| + | **Attack Power - 8 | ||
| + | **Hit Points - 25 | ||
| + | **Speed - 300 | ||
| + | **Range - 3.2 | ||
| + | **Reload Time - 1.4 | ||
| + | **Splash Radius - 2 | ||
| + | **Splash Duration - 5 | ||
| + | **Cost - 11 Products | ||
| + | **Training Time - 30 sec | ||
| + | ===Bazooka=== | ||
| + | The big guy with the big gun. He may be slow but he likes to make a banging entrance... raining death from above. Targets Towers and deals 50% extra damage to them. | ||
| + | *Consumes - 4 Training/Camp Space | ||
| + | *Stats | ||
| + | **Attack Power - 16 | ||
| + | **Hit Points - 60 | ||
| + | **Speed - 180 | ||
| + | **Range - [Max-5.5, Min- 2] | ||
| + | **Reload Time - 1.6 | ||
| + | **Splash Radius - 2 | ||
| + | **Cost - 16 Products | ||
| + | **Training Time - 1.25 Min | ||
| + | |||
| + | ===Raider=== | ||
| + | Rolls into the city fast on her wheels and using smart bombs. She raids the stores like crazy. | ||
| + | *Consumes - 3 Training/Camp Space | ||
| + | *Stats | ||
| + | **Attack Power - 12 | ||
| + | **Hit Points - 30 | ||
| + | **Speed - 450 | ||
| + | **Range - 5.5 | ||
| + | **Reload Time - 1.6 | ||
| + | **Splash Range - 1 | ||
| + | **Cost - 15 Products | ||
| + | **Training Time - 45 sec | ||
| + | |||
| + | ===Detonator=== | ||
| + | Targets all building but reserves best for walls, deals 15x Damage to them. | ||
| + | *Consumes - 4 Training/Camp Space | ||
| + | *Stats | ||
| + | **Attack Power - 20 | ||
| + | **Hit Points - 80 | ||
| + | **Speed - 250 | ||
| + | **Range - 1.5 | ||
| + | **Reload Time - 3 | ||
| + | **Splash Radius - 2 | ||
| + | **Cost - 20 Products | ||
| + | **Training Time - 1.5 Min | ||
| + | |||
| + | ===Ironclad=== | ||
| + | Built like a tank, cuts through defenses like a hot knife through butter. 400% Extra Damage to Turrets and 200% Extra Damage to Walls. | ||
| + | *Consumes - 5 Training/Camp Space | ||
| + | *Stats | ||
| + | **Attack Power - 10 | ||
| + | **Hit Points - 300 | ||
| + | **Speed - 80 | ||
| + | **Range - 1 | ||
| + | **Reload Time - 2 | ||
| + | **Splash Radius - 1 | ||
| + | **Cost - 32 Products | ||
| + | **Training Time - 2.5 Min | ||
| + | |||
| + | ===Medic=== | ||
| + | Not a gangster, but the one who keeps them fighting! Medics spray healing smoke to boost health during attacks. | ||
| + | Ps: They are defenseless, and die when last standing in battle. | ||
| + | *Consumes - 4 Training/Camp Space | ||
| + | *Stats | ||
| + | **Attack Power - 14 | ||
| + | **Hit Points - 20 | ||
| + | **Speed - 170 | ||
| + | **Range - 4 | ||
| + | **Reload Time - 5 | ||
| + | **Splash Radius - 2 | ||
| + | **Cost - 24 Products | ||
| + | **Training Time - 1.6 Min | ||
Latest revision as of 06:33, 22 June 2023
Our friend Logan owns the local pub. Once we boot Billy's goons from his pub, he will let us use his Pub to hire Mercenaries using our product. There are 8 types of Mercenaries available at the moment in the game namely
- Goon
- Hoodlum
- Firebird
- Bazooka
- Raider
- Detonator
- Ironclad
- Medic
Merc Camp
Merc camp is were Mercenaries will be accommodated and just like Mobs Mercs will also have their own individual assign space. There should be enough space available in the Camp to train the new Mercenaries.
Attack
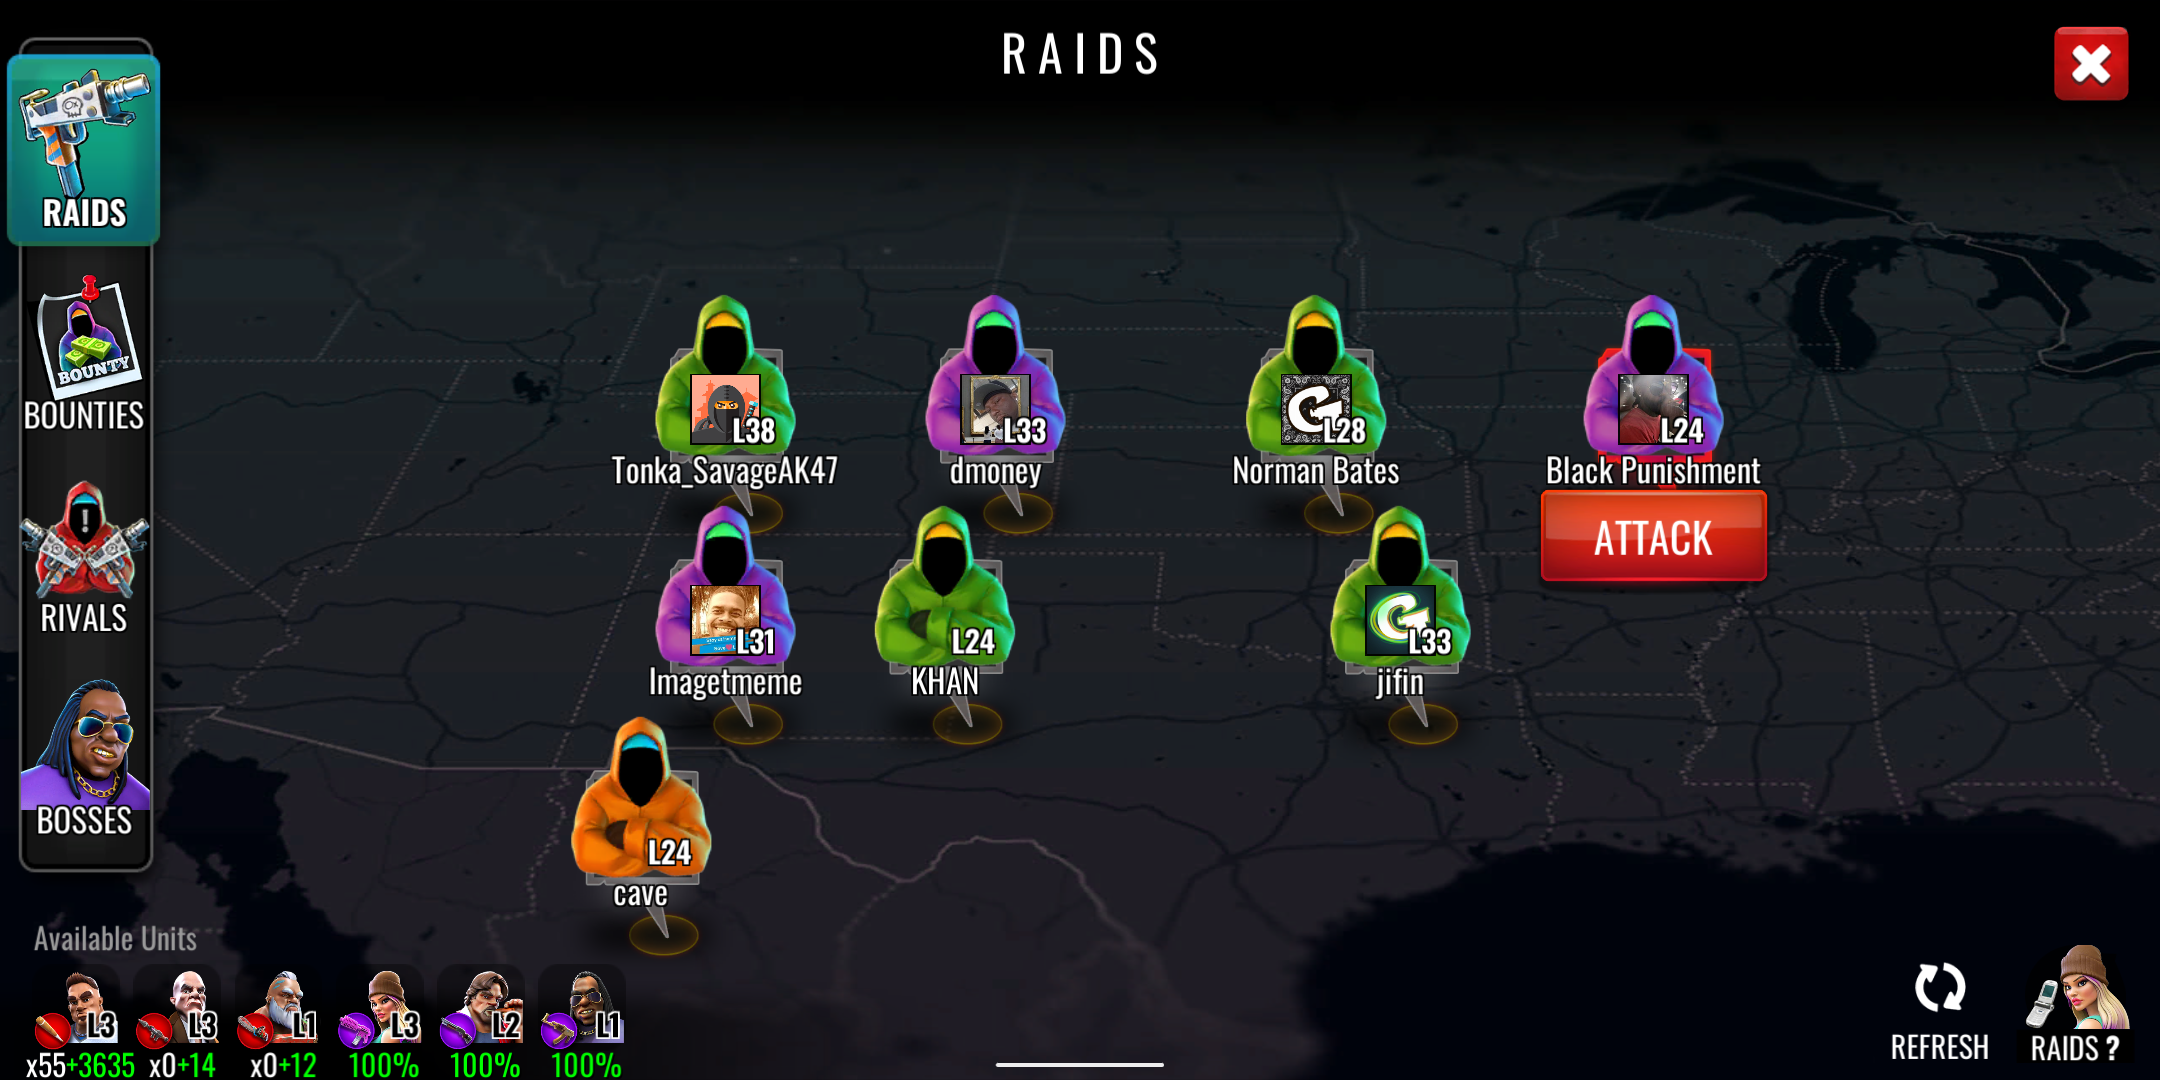
Trained Mercs along with the Bosses will be available to be taken into the attack. The fight button at the Left bottom corner will take the player to the attack screen. On the left side, there will be three Buttons for Attack, Boss Fight, and Rivals. Fight window will have a list of fellow Gangstaz who is in your attack range. From there on clicking attack on any of the opponents will take the player to the opponents Hood. There you can analyze the Hood for 1 minute and then initiate the Fight by dropping the units.
Units can only be dropped one cell outside the buildings and not on the roads too.
Players will win an attack only if they destroy the Mansion, this means even if they destroy at least 50% of the opponents Hood and fails to destroy the mansion it will be treated as a defeat. A star is Given for 50% Destruction and the second for Mansion Destruction and the third and final star is awarded for 100% destruction. But the 50% will be available only if you destroy the Mansion.
The Loot available will be mentioned on the right top side of the screen.
Most mercs will attack the nearest available structure and will attack back the Mobs guarding them if they attack the Mercs. However, each merc has specialization that guides its behaviour in fights. The same applies to the bosses too. But bosses have an attack guide. Players can select a Boss and tap on the screen to guide them during an attack.
PvP attack
Against nearby Gangstaz. There will be a Level check and you will not be able to attack the ones with a Shield.
Boss Fight
Against the Bosses. If you can defeat them 12 Times they will join you as a Boss. Each Boss fight win will earn you a Skill point too.
Rival Attacks
That Gangstaz who has attacked you and won are listed here. You can attack them even if they have a shield or are under your Level limits.
Hitlist
If an opponent is notorious and is too hard to beat, put a price on him. Add that player to the Hitlist and other players will hunt him for you in return of the Bounty. The details are listed on the Hitlist page.
Shield
If a player is attacked a defeated he will have a shield for an hour. This shield will guard you against further attacks but if you initiate an attack the shield will be taken off. Also, the shield is not applicable in Rival hits.
Attack Squad
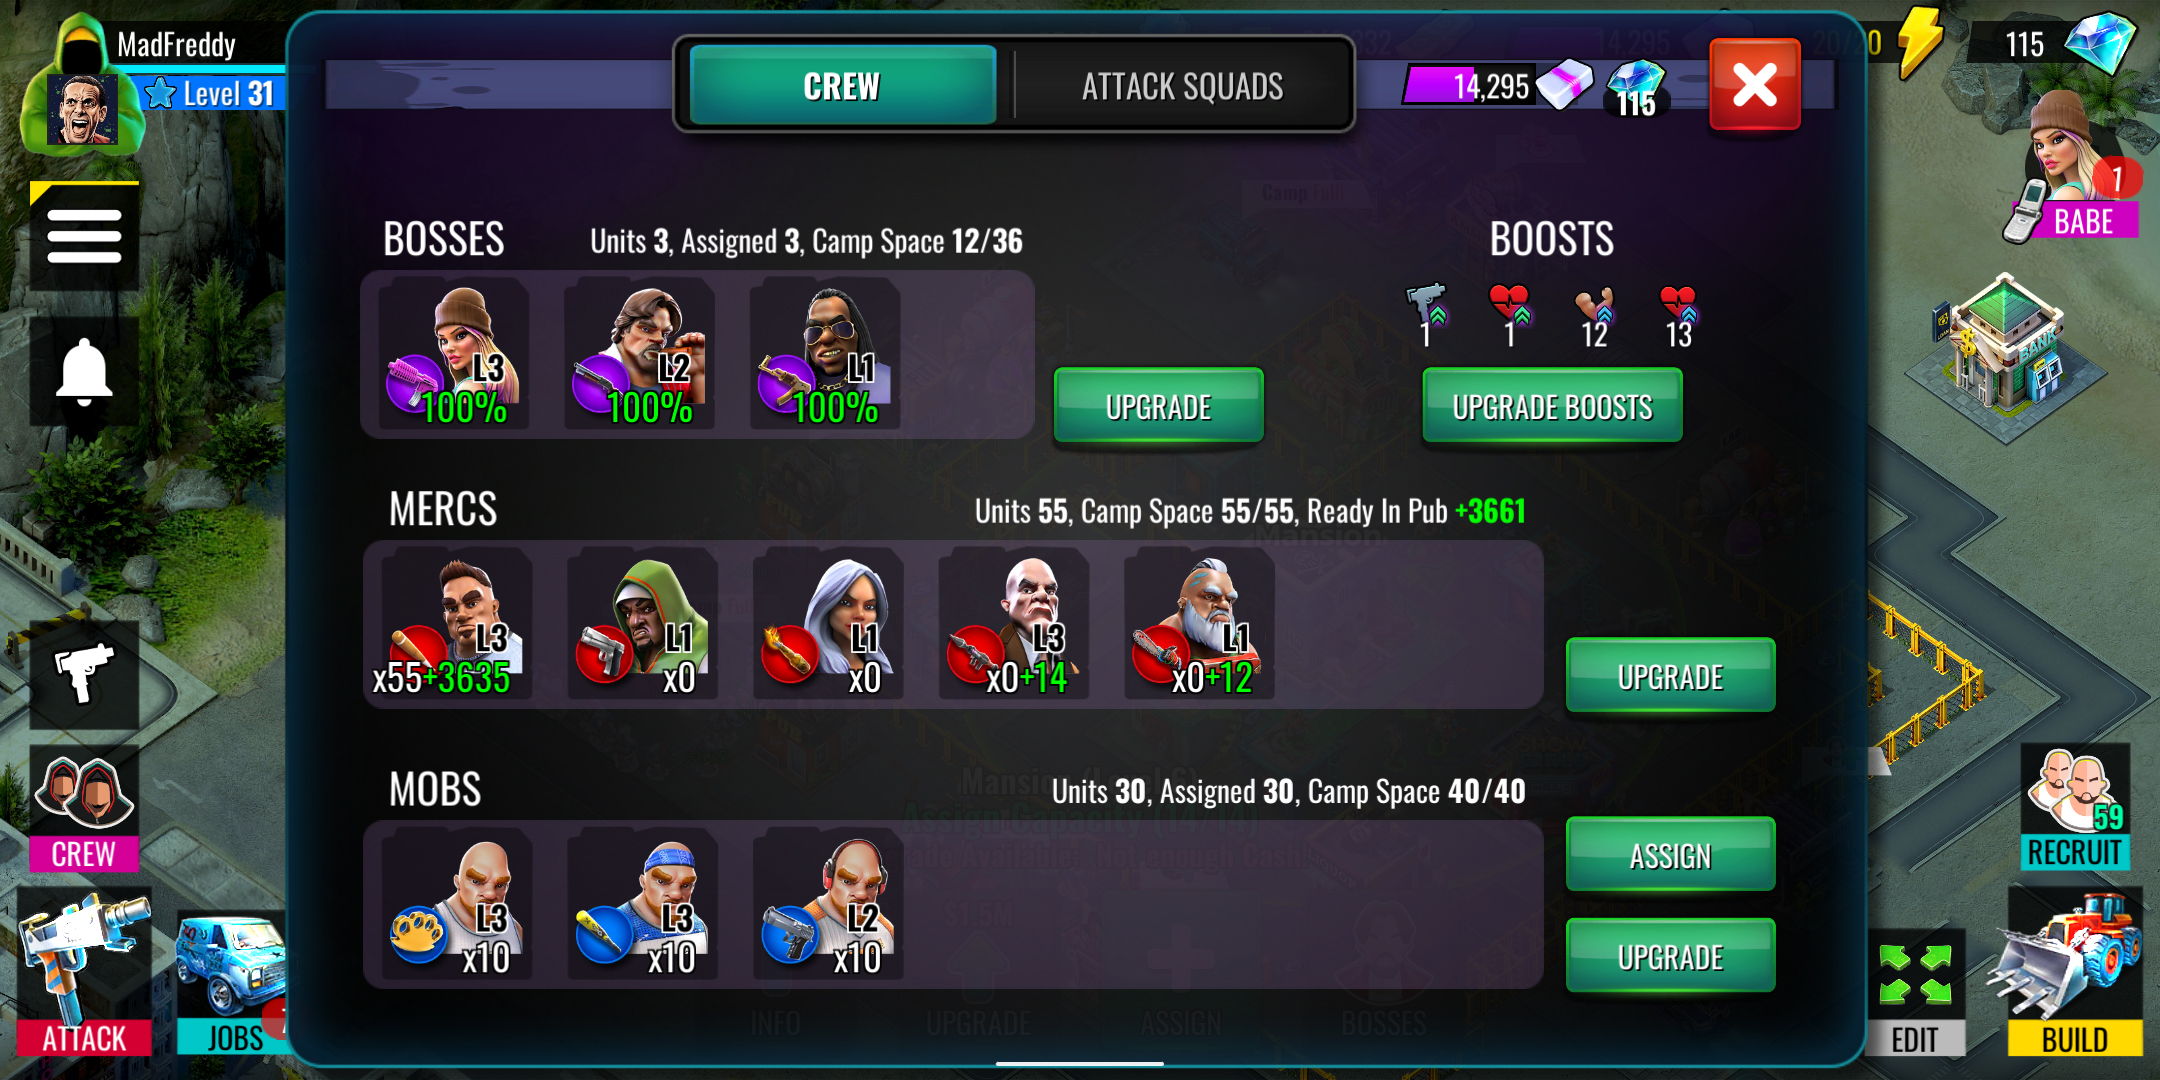
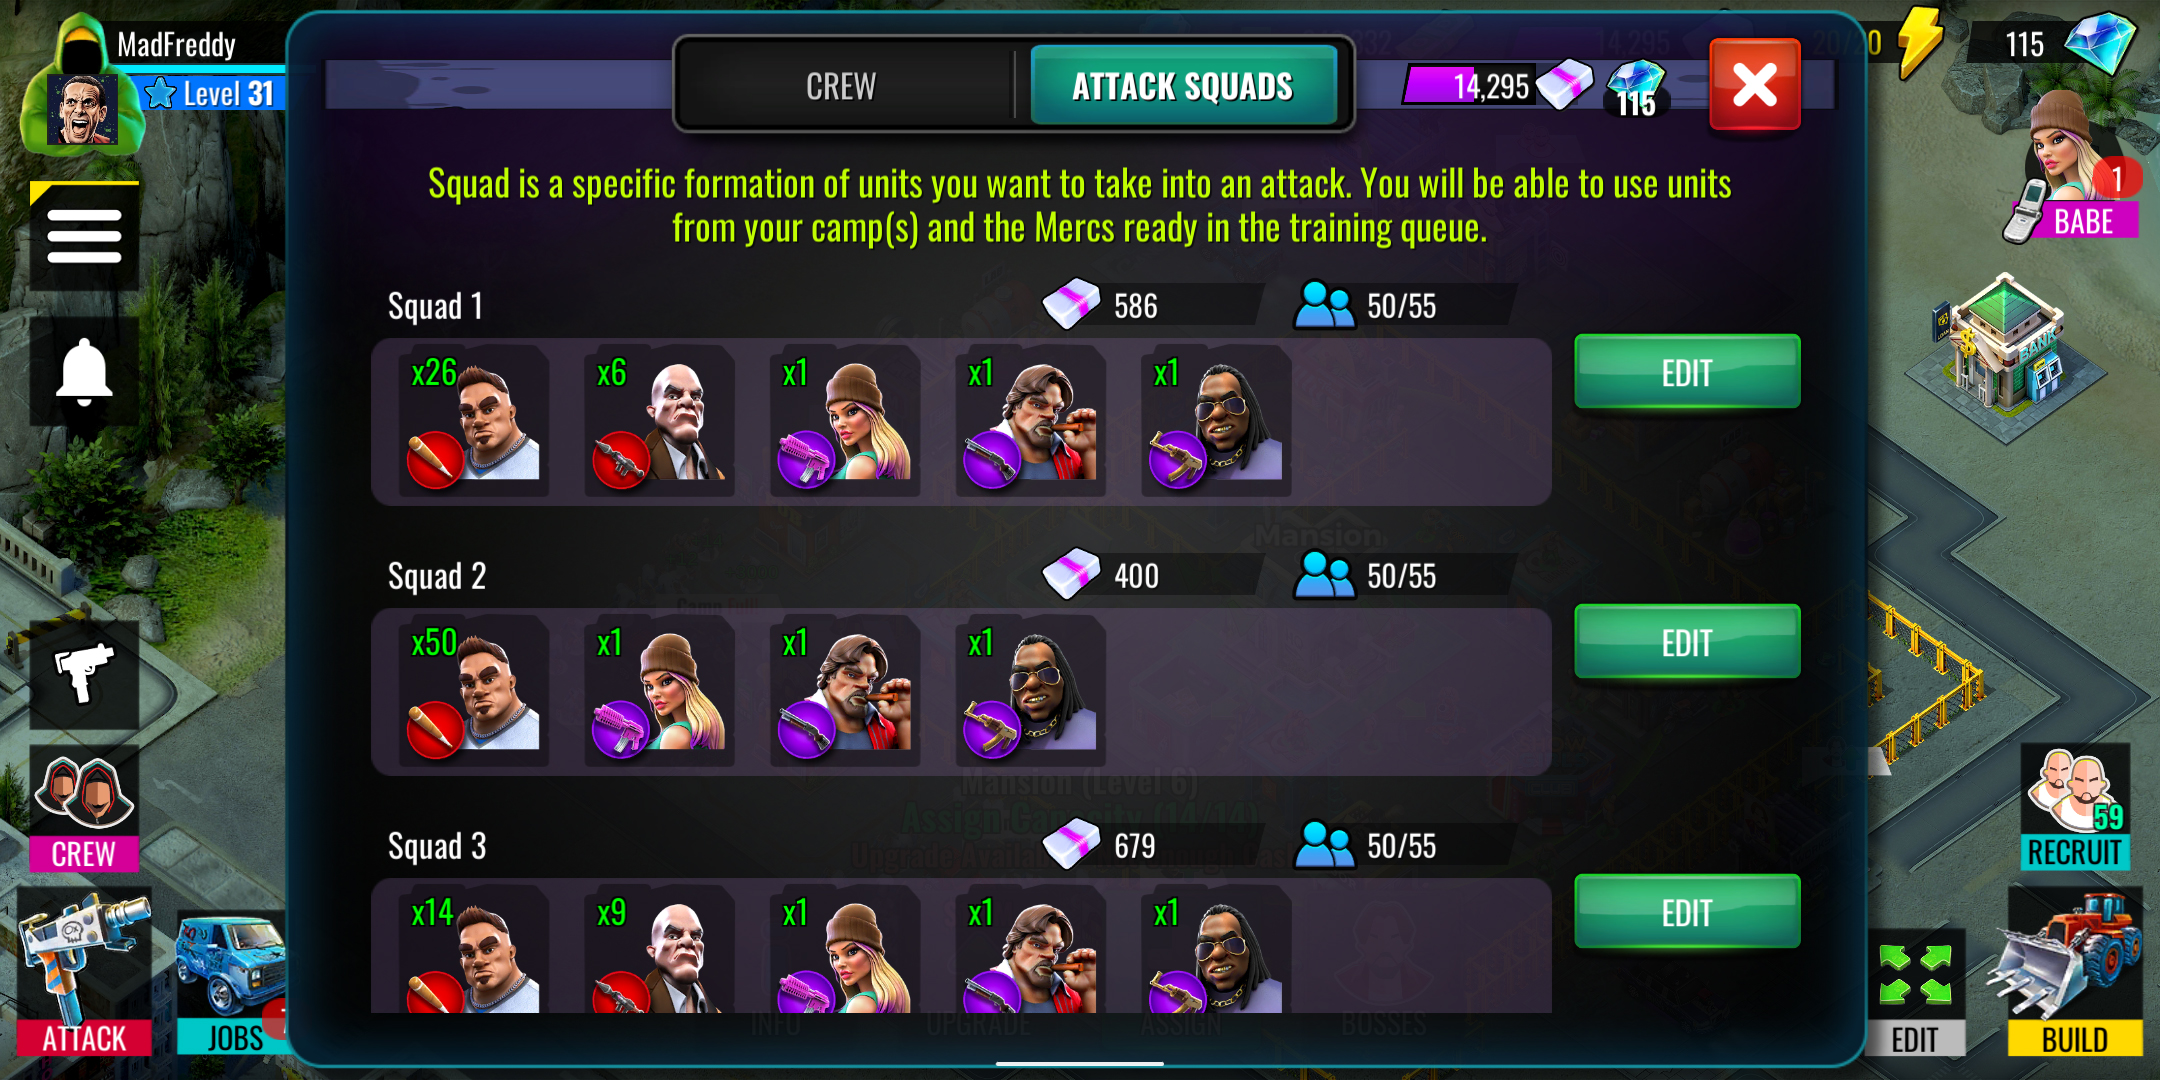
From the Crew Icon on the right-hand side players can access the Crew Menu. There are two option in the Menu; Crew and Attack Squads.
- Crew
It lists the Bosses, Mercs, and Mobs Trained and Ready in the Pub. you can further heal the Bosses and Train/Upgrade Mercs and Mobs from this Menu. Even boosts can also be upgraded from here.
- Attack Squads
Players can create 5 Different attack squads. Click on the Edit button next to each squad line to customize them. Choose the Various Mercs and Bosses you want in your squad and only limitation you have will be the Camp capacity. Also, keep in mind to hire them from the Pub. Now, once this is done, when you are about to attack an opponent, you will have the attack squads option at the bottom left corner - click and select the squad you choose to attack them with and win the Battle.
Merc Workshops
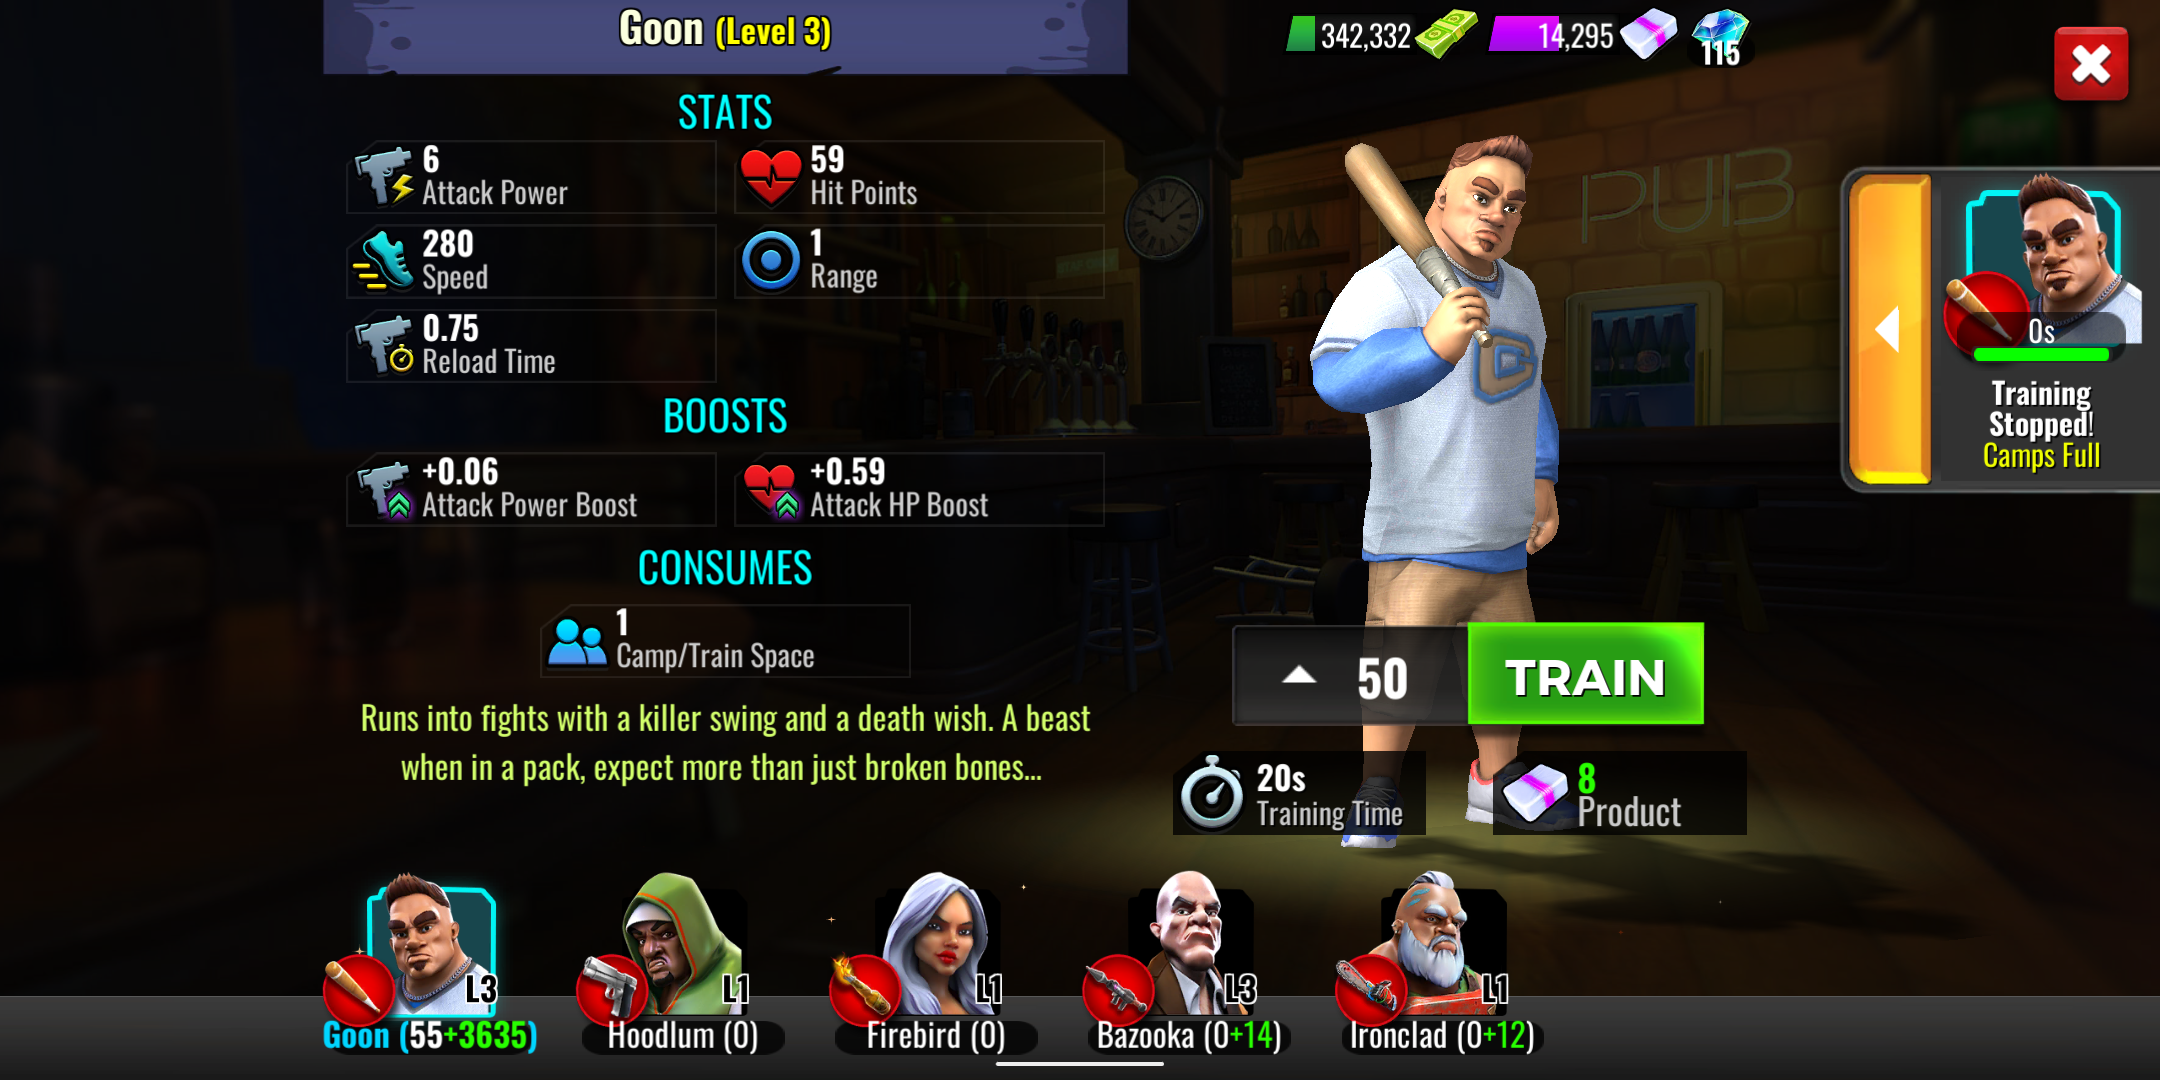
Mercenaries can be trained at Merc Workshops, to improve their abilities and the feature will be available with future updates.
Mercenaries
There are Five Mercenaries and they shall be unlocked at higher levels of Logan's Pub.
Goon
Runs into fights with a killer swing and a deathwish. A beast when in a pack, expect more than just broken bones.
- Consumes - 1 Training/Camp Space
- Stats
- Attack Power - 4
- Hit Points - 30
- Speed - 280
- Range - 1
- Reload Time - 0.75
- Cost - 2 Products
- Training Time - 5 Sec
Hoodlum
A sharpshooter who likes to keep his distance, but hus bullets never miss the mark specially when taking that sweet headshot. Deals 50% extra damage to Units.
- Consumes - 2 Training/Camp Space
- Stats
- Attack Power - 6
- Hit Points - 30
- Speed - 250
- Range - 3.4
- Reload Time - 0.8
- Cost - 6 Products
- Training Time - 15 sec
Firebird
A pyromaniac in high heels. How she runs that fast!! A twisted firestarter who likes to watch her enemies burn down! Deals 50% extra damage to resource buildings.
- Consumes - 3 Training/Camp Space
- Stats
- Attack Power - 8
- Hit Points - 25
- Speed - 300
- Range - 3.2
- Reload Time - 1.4
- Splash Radius - 2
- Splash Duration - 5
- Cost - 11 Products
- Training Time - 30 sec
Bazooka
The big guy with the big gun. He may be slow but he likes to make a banging entrance... raining death from above. Targets Towers and deals 50% extra damage to them.
- Consumes - 4 Training/Camp Space
- Stats
- Attack Power - 16
- Hit Points - 60
- Speed - 180
- Range - [Max-5.5, Min- 2]
- Reload Time - 1.6
- Splash Radius - 2
- Cost - 16 Products
- Training Time - 1.25 Min
Raider
Rolls into the city fast on her wheels and using smart bombs. She raids the stores like crazy.
- Consumes - 3 Training/Camp Space
- Stats
- Attack Power - 12
- Hit Points - 30
- Speed - 450
- Range - 5.5
- Reload Time - 1.6
- Splash Range - 1
- Cost - 15 Products
- Training Time - 45 sec
Detonator
Targets all building but reserves best for walls, deals 15x Damage to them.
- Consumes - 4 Training/Camp Space
- Stats
- Attack Power - 20
- Hit Points - 80
- Speed - 250
- Range - 1.5
- Reload Time - 3
- Splash Radius - 2
- Cost - 20 Products
- Training Time - 1.5 Min
Ironclad
Built like a tank, cuts through defenses like a hot knife through butter. 400% Extra Damage to Turrets and 200% Extra Damage to Walls.
- Consumes - 5 Training/Camp Space
- Stats
- Attack Power - 10
- Hit Points - 300
- Speed - 80
- Range - 1
- Reload Time - 2
- Splash Radius - 1
- Cost - 32 Products
- Training Time - 2.5 Min
Medic
Not a gangster, but the one who keeps them fighting! Medics spray healing smoke to boost health during attacks. Ps: They are defenseless, and die when last standing in battle.
- Consumes - 4 Training/Camp Space
- Stats
- Attack Power - 14
- Hit Points - 20
- Speed - 170
- Range - 4
- Reload Time - 5
- Splash Radius - 2
- Cost - 24 Products
- Training Time - 1.6 Min


